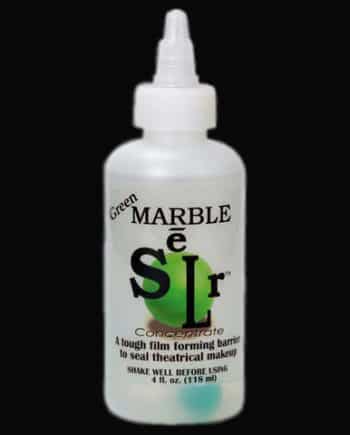
Green Marble SēLr offers a subtle approach to aging. To achieve the desired affect, the finished product will require a translucent and equally subtle paint. The Skin Illustrator color systems provide the perfect compliment.
Ratios
Ratios vary between 1 parts Attagel, to 3-6 parts SēLr concentrate (by volume). The ager does not work with the SPRAY Green Marble SēLr.
Attagel to Green Marble Concentrate
- 1 oz. to 3 oz. Heavy ager on most skin types
- 1 oz. to 4 oz. Medium Heavy
- 1 oz. to 5 oz. Medium Light
- 1 oz. to 6 oz. Light ager on most skin types
A 1 oz. Attagel to 6 oz. Green Marble Concentrate ratio still works well as a fine-line wrinkler when used lightly. This formula also works well for lighter applications, when only a texture change is desirable. Without affecting large wrinkles, this formula changes the texture of the skin, which is excellent for subtle, close-up aging. The application technique is the same idea as stretch and stipple.*
Variables include:
- Desired effect
- Specific area of face
- Elasticity of subject’s skin
- Application method: foam sponge latex vs. brush
With these variables in mind, alter your formula ratios for different areas of your subject’s face in order to customize desired features. This technique may be utilized for the back of your subject’s hands as well.
Materials
Your make-up kit should include the following items:
- Kleenex
- Puffs
- Sponge
- Towels
- Hair dryer
- AF thinner
- Mascara wands
- Assorted Makeup Brushes
- Cups, Q-tips
- Cotton pads
- Kiehl’s Blue Astringent
- Flat white, synthetic brushes 3/8″, 1/2″, 3/4″, 7/8″, 1’ etc.
- Cape
- Skin Illustrator Color palettes
- Makeup Remover(s)
- Hair gray/white
- Scissors
- Panasonic groomer
- Eye wash/drops
- Wax palette
- Witch hazel
- Green marble Selr Spray
- Telesis 5 Thinner
- Moisturizer(s)
- Aloe gel
- Hand Sanitizer
- Spatulas
- Rubber gloves
- Powders
- Hand fan
- 99% alcohol
- Chubs
- Acetone
- Green Marble SēLr Concentrate
The Procedure
*The only facial prepping necessary is to remove fine hairs and lightly wipe the face with Witch Hazel (also try Kiehl’s Blue Astringent). To prevent lashes from sticking while you work, apply AF Thinner to lashes with a mascara wand before application begins.
For ease of application and to control alcohol fumes around the eyes, It is preferred to recline an actor in a chair. However, you may find a combination of prone and upright works best for you.
When beginning the process, think stretch and brush instead of stretch and stipple (Based on techniques used on the feature Clockstoppers). Repairs are made with either 99% alcohol or Telesis thinner. Patching is done with more ager material.
The preferred method is to use a flat white, synthetic bristle brush (between 3/8″ to 1″ in width, depending on the area to be aged). The application changes only in the tool by which you put the SēLr to the skin. Use brush strokes that will complement the direction of wrinkles. For best results, apply 1 to 4 layers, depending on your variables (as many as nine layers were used in some areas for Clockstoppers). Be sure to powder your last stipple layer before releasing. Use the hand fan at a low setting to blow fumes away from air passages at any time.
While aging the face in sections, be careful not to come down too close to the mouth in the nasolabial area. This allows too much material to build up around the mobile area, causing a constant need for repair.
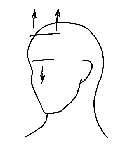 |
Furrow Lines: Area between brows is pulled upward and outward. |
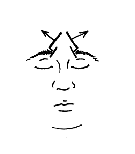 |
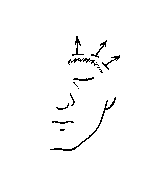
Forehead: Subject scowls to lower brow line and hair line is pulled away from face. |
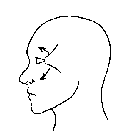 |
Crows Feet: Pull away from Outer corners of both eyes. |
 |
Eyelid: Pull up at eyebrow – Both eyes. |
 |
Under Eye Area: Pull down And toward center of face – Both eyes. |

|
Nasolabial (both):
Option 1 – lift area away from center of face. Option 2 – puff area to be aged |
 |
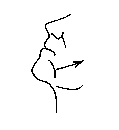
Upper Lip: Puff entire area to be aged (use hand fan). |
 |
Chin: With neck arched, pull both sides of chin away from the center of subject’s face. |
 |
Cheek: Using the subject’s index finger, reach deep into cheek and push out. This is a perfect opportunity to tie the nasolabials, under eye area and crow’s feet together. Both sides. |
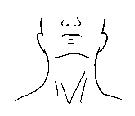  |
Neck: Begin with head back. Throat first. Then with head turned. Both sides. |
Based on experiments for Clockstoppers, the use of a sponge, trapped air onto the surface of the makeup, giving it an undesirable effect.
Repairs & Quick Fixes
Depending on the thickness and placement of the ager, areas of the face may crack or flake, creating a look of severe damage. Do not panic. This usually happens around the mouth, just before or after lunch and near wrap. Repairs can be done quickly and easily by using any of the following three methods:
- Paint 99% alcohol in the direction of the wrinkles.
- Apply Telesis 4 thinner and/or acetone (faster) with a brush. Then apply Green Marble SēLr (use a brush, sponge or spray).
- Apply the original ager material.
Temporary Patching
This technique is particularly useful when you do not have the time to do a thorough repair. Temporary patching mediums include:
- Oil free sodium based moisturizers (Kiehl’s, Kiss My Face, etc.)
- KY jelly
- 99% pure clear aloe
This technique was extremely successful for makeup artist Douglas Noe, while filming Mama Flores Family, in Georgia’s summer heat. The high humidity of the location was definitely a factor in the choice to use a plant-based product.
Removal
The best removal technique to date, to dissolve Green Marble materials, involves the use of IPM Gel (or Isopropyl Myristate), massaged with the fingers, into the skin. In addition, the finger massage technique works exceptionally well around the eyes and is more comfortable for the actor.
Green Marble SēLr techniques are offered in good faith but results will vary given the materials, conditions, actor’s skin and experience with the materials. It is highly recommended that you experiment with techniques before using these tips on your actor. If irritation occurs, discontinue use.


